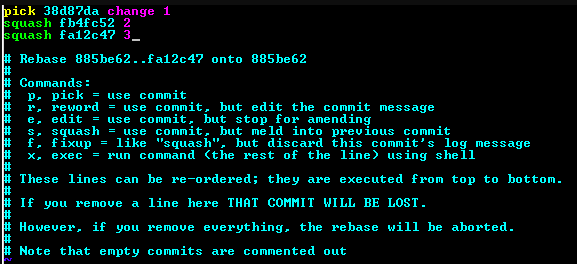
I hardly understand the exact use of git rebase when I was taught for the first time. But during my pinterest project, I started to learn how necessary it is for the team project where my team members use git together. By using git rebase, I can squash many commits in a single commit which helps me to control commit status. This is the process of git rebase I followed.
- It is safe to copy all of your files before you work on git rebase since you might end up mixing all of your history of commits
cp -rpv pinterest-backend pinterest-backend-original
- update master branch of local files before git rebase. Since I’m working on branches, you enter below command line
git checkout master
git pull origin master
Once pulled, you now return to the branch you are currently working on.
git checkout users
Git Rebase
Now, everything is set. On the terminal, you can choose which commits to use. After you finish all git commits, enter git rebase - i to sum up commits as one. For example, if you are going to use the top commit, you leave it as pick and the rest as squash or s.

Why do we need to use git rebase since you can git add and git commit -m to manage your git status?
git rebase allows us to arrange the orders of commits and prevents all the commits tangled up. You might not know which commits you are looking for when you make a pull request for your each commit. In a nut shell, git rebase helps you streamline your all commits so that your master branch won’t get messed up due to the different history of commits from different branches.
We are creating wealth every time we write a code